Our first goal will be writing doing a simple printout. A classical “hello world”. Well, given our restrictions, this is going to take a bit of doing.
Typically, in C, we’d accomplish this by using printf(). However, with a microcontroller, printf goes nowhere by default. So our first goal is to redirect that printf command into something we can pick up with our PCs. We’re going to use UART for this.
We’ve already enabled UART in our cube with the VCP.
Writing into UART
For writing into UART, we’d use the HAL_UART_Transmit function. The function requires the following arguments:
huart, which is a pointer to the UART hardware instance we’re going to use,pData, the pointer to the data we wish to write over UART,Size, indicates how many bytes frompDataare to be transmitted,Timeout, the time in milliseconds to wait for the function to complete, before returning an error.
In order to invoke this, we need to do a few steps first.
First, we must define the string to write. Declaring a char array and initializing it with a predefined string. We can do this by writing const char* my_str = "Hello world";
Next up, we need the length of the the string. We could count it ourselves, and save it to a variable; or we could use the strlen function from the C standard library. For illustration purposes, we’ll do the latter: int length = strlen(my_str);
Finally, we need to dispatch the entire thing into the transmit function. pData will be our string variable (it’s already a pointer), Size will be the length of the string, and for the huart argument, we’ll use &huart2. This can be checked from the STM32CubeMX configurator, look at which of the UART interface is being used for the VCP pins.
In completeness, it looks like this:
/* Private user code ---------------------------------------------------------*/
/* USER CODE BEGIN 0 */
#include <string.h> // This include is necessary for the strlen function.
/* USER CODE END 0 */
and
  /* USER CODE BEGIN 2 */

  /* USER CODE END 2 */

  /* Infinite loop */
  /* USER CODE BEGIN WHILE */
  while (1)
  {
    const char* my_str = "Hello world";
    int length = strlen(my_str);
    HAL_UART_Transmit(&huart2, my_str, length, 100);

    HAL_Delay(1000); // This is necessary to stop the UART from continously writing and spamming.
                     // HAL_Delay(n) will make the microcontroller wait for n milliseconds.
    /* USER CODE END WHILE */

    /* USER CODE BEGIN 3 */
  }
  /* USER CODE END 3 */
This code can now be built with the hammer icon at the top left, and then loaded onto the microcontroller using the green play button:
Don't mind the lack of an STM32 being connected...
Viewing the Output
Now with that, we’ve got our microcontroller sending data to our PC via UART. The next question is: how do we pick that data up and read it? For that, we need a piece of software capable of reading a virtual COM port (VCP). On Windows, Linux, and MacOS, probably one of the most common software for this purpose is PuTTY. If you’re more commandline inclined and on Linux or MacOS, you may also be interested in minicom.
PuTTY
If you’re on Windows, follow the link in the previous section to download PuTTY, and then install it. For Linux
users, I would suggest flatpak: flatpak install uk.org.greenend.chiark.sgtatham.putty. Once installed, run it.
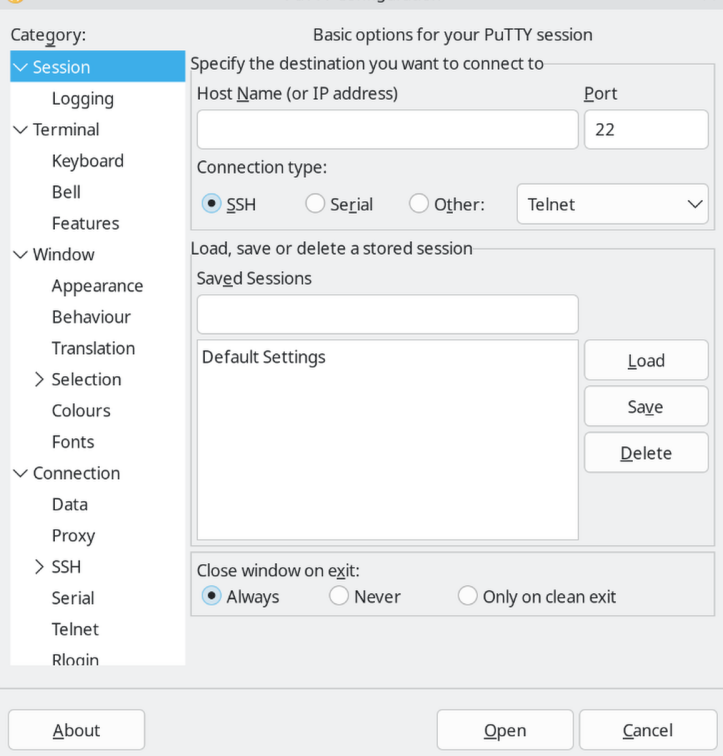
You’ll encounter the following screen:
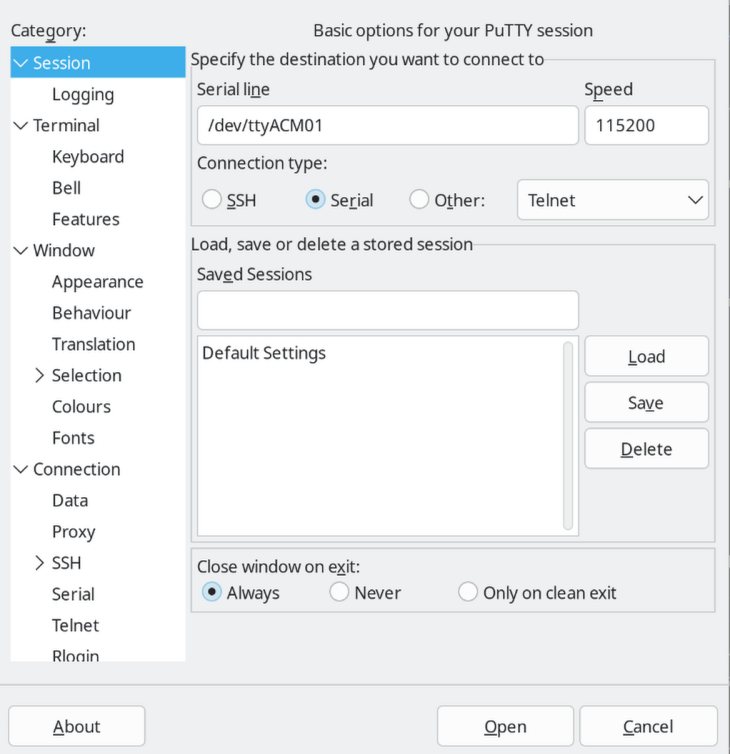
We need to change the “Connection type” to “Serial”, configure the baud to match that of our USART2 (115200), and
provide the proper serial line. On Windows, it’ll be something similar to “COM00” where 00 is a set of numbers.
On Linux, you’ll be looking for a ttyACM0 style entry in your /dev/ folder. As a final result, before pressing
“Open” at the bottom, your setup should look something like this:
minicom
For minicom, consult your local distro package repository for the relevant package. dnf search minicom or apt search minicom should provide the desired results.
Once installed, we need to provide two arguments to the command: -D for the device path, which is going to be ttyACM0 (replace 0 with a potentially different number) in the /dev/ folder, and -b for the baud (115200).
The final command should look something like this:
minicom -D /dev/ttyACM0 -b 115200
If you encounter file permission errors, make sure you have appropriate permissions. Use stat to figure out
what group (Gid) the relevant ttyACM or ttyUSB belongs to, add yourself to that group with sudo usermod -aG dialout my_username_here. Close your current terminal and open your new one, and-or replug the device to
refresh relevant permissions.
In the end, you shuold see our “Hello world” print in perpetuity…
Notice how the lines aren’t broken up, and it’s all in sequence. In order to break the lines up, we need to add
\n\r to the end of our Hello world. These are a newline and carriage return character respectively, and will
force a new line on most systems. With that, the updated code looks like the following:
  /* USER CODE BEGIN 2 */

  /* USER CODE END 2 */

  /* Infinite loop */
  /* USER CODE BEGIN WHILE */
  while (1)
  {
    const char* my_str = "Hello world\n\r";
    int length = strlen(my_str);
    HAL_UART_Transmit(&huart2, my_str, length, 100);

    HAL_Delay(1000);
    /* USER CODE END WHILE */

    /* USER CODE BEGIN 3 */
  }
  /* USER CODE END 3 */
Notice how we only needed to modify the string here, and the length in the length variable was adjusted
accordingly.
Writing with printf
So, we have a way to transmit strings using UART. What we want to do is pipe the output of printf into UART.
For this, we need to provide our own definition for an existing C library implementation function. For the C
library that we’re using, this function is _write.
We have to put this code outside of the main() function, so we’ll use the USER CODE BEGIN 0 section.
The function itself accepts the following arguments:
filethe file handle, we can ignore this argument;ptris the pointer to the string that’s being printed, we have to transmit this via UART;lenis the length of the string inptr.
The function must return the number of characters written, so, assuming success, we return len in every case.
/* Private user code ---------------------------------------------------------*/
/* USER CODE BEGIN 0 */
#include <stdio.h> // necessary for printf
                   // string.h is no longer needed, as we're not using any functions from it.
int _write(int file, char* ptr, int len)
{
  HAL_UART_Transmit(&huart2, ptr, len, 1000);
  return len;
}
/* USER CODE END 0 */
This allows us to replace the code in our main() function with a simple invokation of printf:
  /* USER CODE BEGIN 2 */

  /* USER CODE END 2 */

  /* Infinite loop */
  /* USER CODE BEGIN WHILE */
  while (1)
  {
    printf("Hello world\n\r");

    HAL_Delay(1000);
    /* USER CODE END WHILE */

    /* USER CODE BEGIN 3 */
  }
  /* USER CODE END 3 */
printf will take your string, and will invoke _write with it. This allows us to kick the heavy lifting of
string composition to the C library, instead of doing it ourselves. This simple example doesn’t illustrate it quite
well, but we’ll see it in effect soon enough.
Normal printf usage rules apply from here-on-out. So if we wish to print a variable, for example, the code would
look like the following:
  /* USER CODE BEGIN 2 */
  int data = 0;
  /* USER CODE END 2 */

  /* Infinite loop */
  /* USER CODE BEGIN WHILE */
  while (1)
  {
    printf("Hello world. Some data: %d\n\r", data);
    data++;

    HAL_Delay(1000);
    /* USER CODE END WHILE */

    /* USER CODE BEGIN 3 */
  }
  /* USER CODE END 3 */

